Re-enabling NIC Teaming (LBFO) in Windows 10 & other desktop SKUs, even after Microsoft removed it
Windows Server supports NIC Teaming, also known as Load Balancing/Failover (LBFO), which allows you to bond multiple network interfaces together, for example using 802.3ad (LACP). It used to be possible to use Powershell on Windows 10 to use teaming, even though it wasn’t intended, but in 2016 Microsoft said that the feature was never intended to be available on desktop SKUs, and removed it.
But, if it can be removed, it can be put back in!

By copying a few files and registry keys from a Windows Server installation, it is indeed possible to make this work.
But first, a bunch of disclaimers and caveats:
- If you have any other way of doing NIC teaming on your hardware, you should use that unless you have a really good reason not to. Intel PROSet is ideal if you’re using supported Intel NICs. Chelsio drivers support it natively. Mellanox has a command line tool for it.
- Doing this is probably against the license agreement. The consequences are your responsibility.
- Due to copyright, I cannot and** will not** provide you with the necessary files. Hosting them somewhere would be illegal. You’ll need to acquire a copy of Windows Server and extract the files yourself.
- This process involves copying files into sensitive system directories and making changes to the registry. You could brick your Windows install if you mess up, or possibly even if you don’t mess up.
- Nothing about this is production safe. Seriously. It could crash at any moment and cause data loss and downtime. If I could offer less than zero warranty I would. Don’t come crying to me because you tried this and lost all your customer records or imaginary internet moneys.
- I have barely tested this. I tried it briefly on a Windows 10 Pro 1909 VM, with files copied from a Windows Server 2019 Datacenter 1809 VM, in Hyper-V, using a couple of Hyper-V network interfaces. It should work with other versions, but I can’t be sure. I have no idea if it’ll work on bare metal or with other network cards. I have no idea what happens if you try to use it with RDMA, SR-IOV, or any other advanced feature.
- I have no idea what happens if you run Windows Update,
sfc /scannow, System Restore, or anything else while these modifications are in effect. Could do nothing, could revert the changes, could BSoD, could brick your install. - You will not receive security updates for the components you copy across. The process also involves installing a security catalog file, which will also not be kept up-to-date. There may be additional hidden security impacts.
- This procedure only makes the NetLbfo Powershell commands work. I did manage to get
LbfoAdmin.exeto run and not crash[1]., but it doesn’t actually work because it needs substantial access to features (mostly WMI stuff) that desktop SKUs don’t have. So no GUI stuff, sadly.
If you’ve read all that, understand it, and you’re still on-board and ready to move fast and break things, then read ahead. Otherwise turn back now. Here be dragons.
This article goes through all of the details of how the process works and how it was discovered, but if you’re not interested then you can skip over most of this to the “putting it all together” section, where I provide a concise set of instructions.
Finding and extracting the LBFO components
The first step of the process is identifying the components we need and copying them over. The driver was fairly obvious: I searched the System32 directory for files containing “LBFO” and it appeared. Drivers also have some supporting files - the .inf file that describes it, the .mui file that provides localisation of UI elements, and the .inf_loc file that contains some string data describing the driver.
The next step was looking for what additional components, if any, the Powershell cmdlets needed in order to run properly. The New-NetLbfoTeam Powershell command’s documentation states that it returns an MSFT_NetLbfoTeam object. Most of these types of commands are implemented via WMI providers, and the MSFT prefix gives this away too. The requirements section at the bottom of the MSFT_NetLbfoTeam class documentation state that it is exposed via MsNetImPlatform.mof, and implemented in NdisIMPlatCim.dll. These files are kept in the System32\wbem directory. Luckily, these files are already available on Windows 10 (hence why the LBFO commands are still available in Powershell, even though they don’t normally work) and exactly match the ones on a Windows Server system. In short, this means we only really need the driver to make this work.
Initially I was checking for these files on a virtual machine, but later I realised that these files are also trivial to extract straight from the (freely available) ISO, which saves the effort of actually installing Windows Server. The ISO contains an archive at the path \sources\install.wim which can be opened with 7-zip, either by extracting it from the ISO or just right clicking within the 7-zip GUI and selection Open Inside.
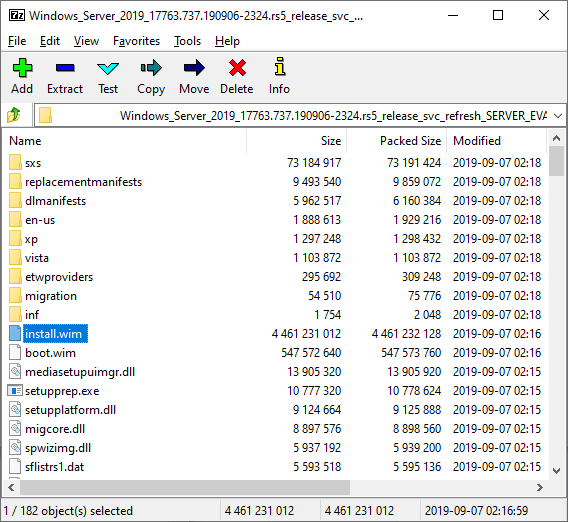
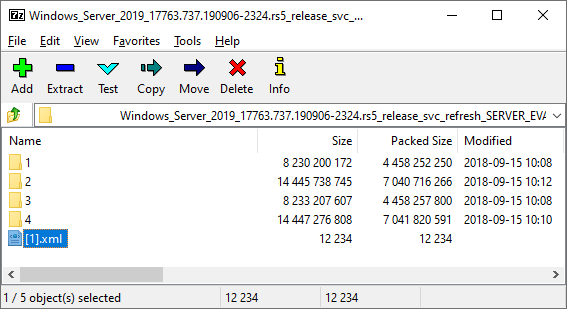
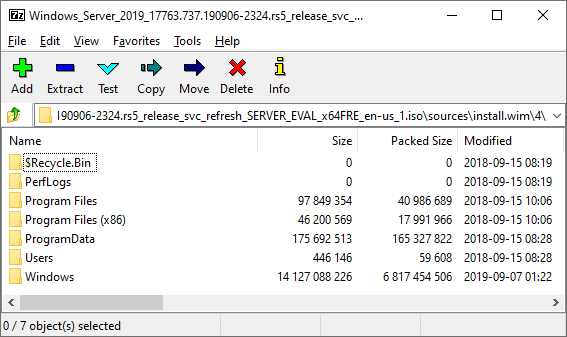
The install.wim archive contains template Windows installations for a number of SKUs - in this case core and full installs of Server 2019 Standard and Server 2019 Datacenter. These are organised by numerical folders in the root of the archive, and by extracting the [1].xml file from the root of this archive we can look at the metadata within and decide which image we want to extract from. In this case the best image is number 4, which is the full install of Windows Server 2019 Datacenter Edition. Inside this directory is a normal Windows filesystem.
The driver files we need are:
- .sys
- -US.sys.mui
- -US.inf_loc
- .inf_amd64_9afb7ecb68781bac.inf (the hex part of this path may change based on version)
There’s one more file we need, but I’ll get to that in a moment.
Preparing the target system for the LBFO driver
Unfortunately, it isn’t quite as simple as copying the driver and INF file and clicking install. For starters, since it’s a pre-installed driver, it can’t be installed like a normal driver, either through the context menu in Explorer or via the “Have Disk…” option in the network features panel. Another issue is that the driver file doesn’t actually contain a digital signature, which is normally required for loading drivers. Instead, its signature is contained in a security catalog, which we need to identify and extract. If you attempt to use the driver without this catalog, you’ll get error 0xe000022f, indicating that the driver is not signed.
First let’s fix the digital signature issue. Finding the security catalog file that contains the signature for the driver is fairly easy, using sigcheck, if you’re already running a Windows Server VM[2]. Just run the following command:
sigcheck -i c:\windows\system32\drivers\mslbfoprovider.sysThe results should look something like this:
c:\windows\system32\drivers\MsLbfoProvider.sys:
        Verified:       Signed
        Link date:      06:39 19/10/1949
        Signing date:   08:03 15/09/2018
        Catalog:        C:\Windows\system32\CatRoot\{F750E6C3-38EE-11D1-85E5-00C04FC295EE}\Microsoft-Windows-Server-Features-Package017~31bf3856ad364e35~amd64~~10.0.17763.1.cat
        Signers:
           Microsoft Windows
                Cert Status:    This certificate or one of the certificates in the certificate chain is not time valid.
                Valid Usage:    NT5 Crypto, Code Signing
                Cert Issuer:    Microsoft Windows Production PCA 2011
                Serial Number:  33 00 00 01 C4 22 B2 F7 9B 79 3D AC B2 00 00 00 00 01 C4
                Thumbprint:     AE9C1AE54763822EEC42474983D8B635116C8452
                Algorithm:      sha256RSA
                Valid from:     21:45 03/07/2018
                Valid to:       21:45 26/07/2019
           Microsoft Windows Production PCA 2011
                Cert Status:    Valid
                Valid Usage:    All
                Cert Issuer:    Microsoft Root Certificate Authority 2010
                Serial Number:  61 07 76 56 00 00 00 00 00 08
                Thumbprint:     580A6F4CC4E4B669B9EBDC1B2B3E087B80D0678D
                Algorithm:      sha256RSA
                Valid from:     19:41 19/10/2011
                Valid to:       19:51 19/10/2026
           Microsoft Root Certificate Authority 2010
                Cert Status:    Valid
                Valid Usage:    All
                Cert Issuer:    Microsoft Root Certificate Authority 2010
                Serial Number:  28 CC 3A 25 BF BA 44 AC 44 9A 9B 58 6B 43 39 AA
                Thumbprint:     3B1EFD3A66EA28B16697394703A72CA340A05BD5
                Algorithm:      sha256RSA
                Valid from:     22:57 23/06/2010
                Valid to:       23:04 23/06/2035
        Counter Signers:
           Microsoft Time-Stamp Service
                Cert Status:    This certificate or one of the certificates in the certificate chain is not time valid.
                Valid Usage:    Timestamp Signing
                Cert Issuer:    Microsoft Time-Stamp PCA 2010
                Serial Number:  33 00 00 00 E4 DA 1F 36 DE F7 70 2D D8 00 00 00 00 00 E4
                Thumbprint:     BFC00ED3A5E22144978AC343057DCAF68AD64A3A
                Algorithm:      sha256RSA
                Valid from:     21:27 23/08/2018
                Valid to:       21:27 23/11/2019
           Microsoft Time-Stamp PCA 2010
                Cert Status:    Valid
                Valid Usage:    All
                Cert Issuer:    Microsoft Root Certificate Authority 2010
                Serial Number:  61 09 81 2A 00 00 00 00 00 02
                Thumbprint:     2AA752FE64C49ABE82913C463529CF10FF2F04EE
                Algorithm:      sha256RSA
                Valid from:     22:36 01/07/2010
                Valid to:       22:46 01/07/2025
           Microsoft Root Certificate Authority 2010
                Cert Status:    Valid
                Valid Usage:    All
                Cert Issuer:    Microsoft Root Certificate Authority 2010
                Serial Number:  28 CC 3A 25 BF BA 44 AC 44 9A 9B 58 6B 43 39 AA
                Thumbprint:     3B1EFD3A66EA28B16697394703A72CA340A05BD5
                Algorithm:      sha256RSA
                Valid from:     22:57 23/06/2010
                Valid to:       23:04 23/06/2035
        Company:        Microsoft Corporation
        Description:    Microsoft Load Balancing/Failover Provider
        Product:        Microsoft Windows Operating System
        Prod version:   10.0.17763.1
        File version:   10.0.17763.1 (WinBuild.160101.0800)
        MachineType:    64-bit
The most important thing in this output is the catalog path, which tells us which security catalog file the driver’s signature is in. Luckily this path doesn’t change much, so you can probably just use the one from this output instead of running the command yourself on a Windows Server VM.
This catalog can be extracted from the install.wim archive in the same way as before. Once we’ve got it out, we can verify that it contains a signature for our extracted driver file, using the -f switch to specify which catalog file we want to look in:
sigcheck -i -f Microsoft-Windows-Server-Features-Package017~31bf3856ad364e35~amd64~~10.0.17763.1.cat mslbfoprovider.sysThis should print out the same result as above.
You’ll need to copy the catalog file into the catroot directory, matching where it was on your Windows Server VM. You can’t do this manually by copy-pasting the files in Explorer, because of directory permissions, so just keep the catalog file with your other extracted files for now and I’ll explain how to copy them to the right locations in the next section.
The next issue is actually finding a way to get the driver registered on the system. Attempting to just install it via the INF isn’t possible because it’s missing all the information that you’d normally have in an installable INF file. Same goes for installing it via the network services.
What I opted to do is extract the registry information related the the driver service, network feature service, and Windows Event Log provider, from a Windows Server VM. This can then be imported back into a Windows 10 install without problems.
The MsLbfoProvider kernel driver service is defined in the registry as follows:
Windows Registry Editor Version 5.00

[HKEY_LOCAL_MACHINE\SYSTEM\CurrentControlSet\Services\MsLbfoProvider]
"Description"="@%SystemRoot%\\System32\\drivers\\MsLbfoProvider.sys,-501"
"DisplayName"="@%SystemRoot%\\System32\\drivers\\MsLbfoProvider.sys,-501"
"ErrorControl"=dword:00000001
"Group"="NDIS"
"ImagePath"=hex(2):53,00,79,00,73,00,74,00,65,00,6d,00,33,00,32,00,5c,00,64,00,\
  72,00,69,00,76,00,65,00,72,00,73,00,5c,00,4d,00,73,00,4c,00,62,00,66,00,6f,\
  00,50,00,72,00,6f,00,76,00,69,00,64,00,65,00,72,00,2e,00,73,00,79,00,73,00,\
  00,00
"Start"=dword:00000003
"Type"=dword:00000001

[HKEY_LOCAL_MACHINE\SYSTEM\CurrentControlSet\Services\MsLbfoProvider\Parameters]
The ms_lbfo network feature provider looks like this:
Windows Registry Editor Version 5.00

[HKEY_LOCAL_MACHINE\SYSTEM\CurrentControlSet\Control\Network\{4d36e974-e325-11ce-bfc1-08002be10318}\{FC66A602-B769-4666-A540-CA3DF0E7DF2C}]
"InstallTimeStamp"=hex:dd,07,0c,00,04,00,05,00,00,00,00,00,00,00,00,00
"Characteristics"=dword:00040000
"ComponentId"="ms_lbfo"
"Description"="@%SystemRoot%\\System32\\drivers\\MsLbfoProvider.sys,-501"
"InfPath"="MsLbfoProvider.inf"
"InfSection"="Install"
"LocDescription"="@%SystemRoot%\\System32\\drivers\\MsLbfoProvider.sys,-501"

[HKEY_LOCAL_MACHINE\SYSTEM\CurrentControlSet\Control\Network\{4d36e974-e325-11ce-bfc1-08002be10318}\{FC66A602-B769-4666-A540-CA3DF0E7DF2C}\Ndi]
"TimeStamp"=hex:dd,07,0c,00,04,00,05,00,00,00,00,00,00,00,00,00
"HelpText"="@%SystemRoot%\\System32\\drivers\\MsLbfoProvider.sys,-500"
"Service"="MsLbfoProvider"

[HKEY_LOCAL_MACHINE\SYSTEM\CurrentControlSet\Control\Network\{4d36e974-e325-11ce-bfc1-08002be10318}\{FC66A602-B769-4666-A540-CA3DF0E7DF2C}\Ndi\Interfaces]
"LowerRange"="nolower"
"UpperRange"="noupper"
"FilterMediaTypes"="ms_implatform"
And the MsLbfoProvider event log key is as follows:
Windows Registry Editor Version 5.00

[HKEY_LOCAL_MACHINE\SYSTEM\CurrentControlSet\Services\EventLog\System\MsLbfoProvider]
"ProviderGuid"=hex(2):7b,00,33,00,38,00,37,00,65,00,64,00,34,00,36,00,33,00,2d,\
  00,38,00,62,00,31,00,62,00,2d,00,34,00,32,00,63,00,39,00,2d,00,39,00,65,00,\
  66,00,30,00,2d,00,38,00,30,00,33,00,66,00,64,00,66,00,64,00,35,00,64,00,39,\
  00,34,00,65,00,7d,00,00,00
These keys are enough to make Windows recognise the driver and allow you to enable it on network adapters.
Installing the necessary files
The files we extracted (driver file, supporting files, and catalog) need to be copied to the same path they came from, but on the target system. A couple of these can’t be written to by regular administrators, as they are only accessible by SYSTEM. The easiest way to solve this is to use psexec to launch a command prompt as SYSTEM:
C:\Windows\System32>psexec -s -i cmd.exe

C:\Windows\system32>whoami
nt authority\system
You can then successfully do the file copies from there. You can also do the registry imports at the same time, using reg import.
Turning LBFO on and using it
The last step is to get Windows to start the service. If you attempt to start it manually, e.g. with sc, it won’t work. It complains that a device attached to the system is not functioning. I’m fairly sure this is because it’s expecting to be loaded on demand by NDIS, rather than started manually.
To get it up and running, right click a network adapter, go to Properties, click Install, select Service, click Add, then scroll down and select “Microsoft Load Balancing/Failover Provider”. Windows will warn you that the driver is not digitally signed, but this only a UI issue. Clicking OK will appear to do nothing. But if you now run sc query mslbfoprovider you’ll see that the driver is loaded and running:
C:\Windows\system32>sc query mslbfoprovider

SERVICE_NAME: mslbfoprovider
        TYPE               : 1  KERNEL_DRIVER
        STATE              : 4  RUNNING
                                (STOPPABLE, NOT_PAUSABLE, IGNORES_SHUTDOWN)
        WIN32_EXIT_CODE    : 0  (0x0)
        SERVICE_EXIT_CODE  : 0  (0x0)
        CHECKPOINT         : 0x0
        WAIT_HINT          : 0x0
You should now be able to use the LBFO commands in Powershell to manage and create teams.
Putting it all together
To make things easy and clear, I’ve put together a series of instructions on how to enable LBFO, without all of the details.
Prerequisites
You need some tools. Install 7-zip, psexec, and sigcheck. For the latter two it’s best to put them in C:\Windows\System32 just so they’re in the path. You’ll also need a Windows Server ISO, and the easiest way to get that is directly from Microsoft in the form of a Windows Server 2019 Evaluation ISO.
You should also clone my lbfo_win10 repositry on GitHub, which contains the batch files and registry files for convenience.
Extracting the files
Open the ISO in 7-zip and extract the install.wim archive from the sources directory. Then you’ll want to use the extract.bat script from the repository to pull out the files we need:
mkdir extracted

set SevenZipPath="C:\Program Files\7-zip\7z.exe"
set InstallWim=install.wim
set ImageIndex=4
set CatalogGUID={F750E6C3-38EE-11D1-85E5-00C04FC295EE}
set CatalogName=Microsoft-Windows-Server-Features-Package017~31bf3856ad364e35~amd64~~10.0.17763.1.cat

set PathsToExtract=%ImageIndex%\Windows\System32\CatRoot\%CatalogGUID%\%CatalogName%
set PathsToExtract=%PathsToExtract% %ImageIndex%\Windows\System32\drivers\mslbfoprovider.sys
set PathsToExtract=%PathsToExtract% %ImageIndex%\Windows\System32\drivers\en-US\mslbfoprovider.sys.mui
set PathsToExtract=%PathsToExtract% %ImageIndex%\Windows\System32\DriverStore\en-US\MsLbfoProvider.inf_loc
set PathsToExtract=%PathsToExtract% %ImageIndex%\Windows\System32\DriverStore\FileRepository\mslbfoprovider.inf_amd64_*

%SevenZipPath% x -aoa -o.\extracted %InstallWim% %PathsToExtract%

sigcheck -accepteula -i -f .\extracted\%ImageIndex%\Windows\System32\CatRoot\%CatalogGUID%\%CatalogName% .\extracted\%ImageIndex%\Windows\System32\drivers\mslbfoprovider.sys
This extracts the necessary files from image index 4 in the install.wim file. If you’re doing this with some future release of Windows then you may need to change ImageIndex, CatalogGUID, and CatalogName to different values, as discussed earlier in this blog post.
When you run this you should see 7-zip output containing “Everything is Ok”, with 5 files extracted, possibly with a warning about incorrect reference counts (just ignore this). You should also see some sigcheck output showing that the extracted driver is signed by the extracted catalog file.
The extracted files are put into a directory called extracted, and you can browse this to take a look at what was extracted if you want. Just in case you’re worried you’re missing a file, here’s what my extracted directory looks like:
.
└───4
    └───Windows
        └───System32
            ├───CatRoot
            │   └───{F750E6C3-38EE-11D1-85E5-00C04FC295EE}
            │           Microsoft-Windows-Server-Features-Package017~31bf3856ad364e35~amd64~~10.0.17763.1.cat
            │
            ├───drivers
            │   │   MsLbfoProvider.sys
            │   │
            │   └───en-US
            │           MsLbfoProvider.sys.mui
            │
            └───DriverStore
                ├───en-US
                │       MsLbfoProvider.inf_loc
                │
                └───FileRepository
                    └───mslbfoprovider.inf_amd64_9afb7ecb68781bac
                            mslbfoprovider.inf
Installing the files
Save the registry files I showed earlier in this blog post as mslbfo_service.reg, mslbfo_network_provider.reg, and mslbfo_eventlog.reg respectively, or just use the git repository which has all of them created for you already.
Next, you’ll want to start a command prompt as SYSTEM in order to install these files on your system:
psexec -s -i cmd.exeFrom there, change directory to where you’ve got the batch files, registry keys, and extracted directory, then run install.bat, which should look like this:
set ImageIndex=4

xcopy /H /Y /E .\extracted\%ImageIndex% C:\
reg import mslbfo_service.reg
reg import mslbfo_network_provider.reg
reg import mslbfo_eventlog.reg
sigcheck -accepteula -i c:\windows\system32\drivers\mslbfoprovider.sys
The output of this command should show 5 files copied successfully, three successful registry imports, and finally some sigcheck output that shows that the driver is recognised as signed.
If all has gone as planned, you now need to reboot. This is required because the system won’t see these changes until the OS next starts up.
Enabling the driver
Start a command prompt as administrator, and check that the service is appearing properly:
C:\Windows\system32>sc query mslbfoprovider

SERVICE_NAME: mslbfoprovider
        TYPE               : 1  KERNEL_DRIVER
        STATE              : 1  STOPPED
        WIN32_EXIT_CODE    : 0  (0x0)
        SERVICE_EXIT_CODE  : 0  (0x0)
        CHECKPOINT         : 0x0
        WAIT_HINT          : 0x0
This should show that the service exists, but is stopped. If you try to start it, it won’t work just yet.
Next, go to Network Connections and right click on any network adapter, go to Properties, then click Install, select Service, and click Add. At the bottom you should see “Microsoft Load Balancing/Failover Provider”.
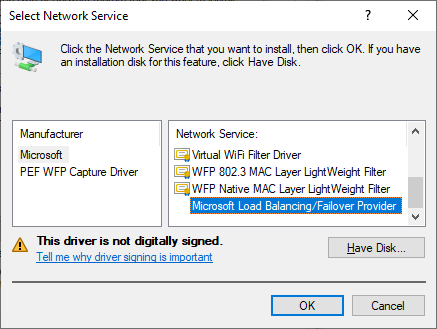
Don’t worry about it saying the driver is not signed - the UI doesn’t see it as signed, but the kernel does, and that’s all we care about.
If you don’t see this entry, copy the extracted MsLbfoProvider.sys and mslbfoprovider.inf files to the same directory somewhere, then use Have Disk… to navigate to the INF file and use that. If it doesn’t work, you may have missed a step somewhere. Verify that the driver is showing up as signed with sigcheck, verify that the mslbfoprovider service exists, and try manually importing the registry keys.
If you click OK after selecting the LBFO provider, it should… do nothing! It’ll look like absolutely nothing happened. However, if you go back and check the service again, it should be running.
C:\Windows\system32>sc query mslbfoprovider

SERVICE_NAME: mslbfoprovider
        TYPE               : 1  KERNEL_DRIVER
        STATE              : 4  RUNNING
                                (STOPPABLE, NOT_PAUSABLE, IGNORES_SHUTDOWN)
        WIN32_EXIT_CODE    : 0  (0x0)
        SERVICE_EXIT_CODE  : 0  (0x0)
        CHECKPOINT         : 0x0
        WAIT_HINT          : 0x0
You can now open a Powershell prompt as administrator and try out the LBFO commands.
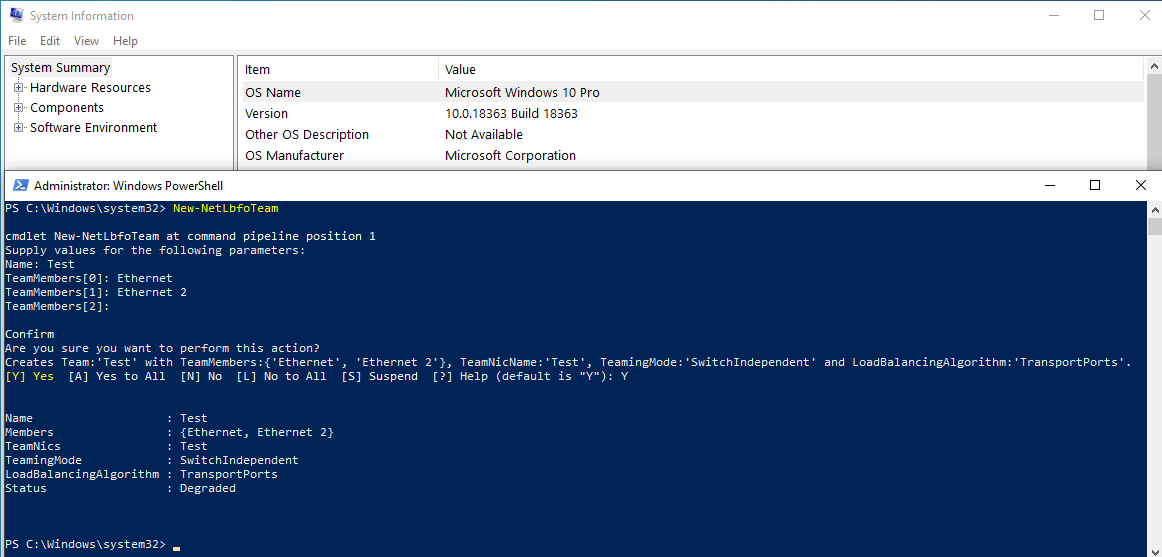
If all went well, you’ve now successfully created a NIC team.
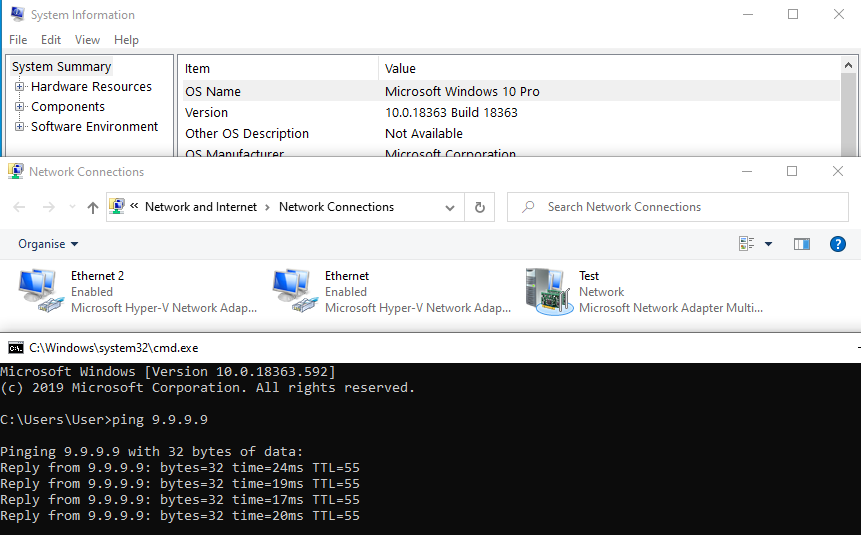
Yay, it works! Enjoy.
Footnotes:
Thanks for reading this post! If you enjoyed it and want to say thanks, consider purchasing some of my amusing warning stickers. They’re 100% guaranteed to not contain bees.