Using uMod Patcher to create new hooks for Rust (the game)
I’ve recently been making some mods for the game Rust. I don’t play much of the game myself, as I’m pretty bad at FPS games in general, but I do enjoy watching a select few YouTubers and streamers play it. One thing that I’ve seen a bunch of them complain about is the excessive use of autoturrets and other traps during raids, and for griefing people and areas. While I can’t do much to help the vanilla players, I am familiar with making mods for the game using the Oxide mod framework, which is now part of uMod. Rust is a Unity game and anyone can set up their own server, so having access to the game binaries makes it fairly easy to reverse engineer the parts I need to.
The way uMod works is that you write a C# script file, place it into the mods folder, and the game dynamically compiles it and runs it. If you change the file, uMod unloads the existing mod and reloads your changed one. This makes it quite nice to work with. Certain events in the game are hooked, so you can create methods like OnItemPickup or CanBuild in order to trigger functionality when these events/callbacks occur and change the game’s behaviour. Take a look at the API if you’re interested in the details.
It wasn’t particularly difficult to build a Turret Limits mod for the game, but I quickly got ideas for extra features and some player requests to expand the mod to for allow limitation of other trap types - flamethrower turrets and shotgun traps in particular. The problem was that some of the features I wanted to work on required access to functionality that didn’t exist within uMod. While there is an OnTurretTarget hook, there were no hooks for when flamethrower turrets or shotgun traps fire, and I needed those in order to fully implement a feature whereby traps won’t fire unless there’s an active power source in your base. I figured I’d go ahead and add those features and submit a pull request, since uMod is on GitHub. ## Getting started with uMod Patcher Doing so was somewhat involved, but also pretty interesting. The way uMod’s hooking system works is via a tool they wrote called Patcher. The hooks are effectively rules about where to inject callbacks into the game’s IL, stored in a JSON file with a .opj extension (I presume meaning Oxide Project), and Patcher allows you to create or modify these definitions and see the IL and pseudo-C# before and after the hook is applied. Patcher stores hashes of the IL of each hooked method and warns if the IL has changed since the last time the project file was opened, which allows the developers to quickly update any broken hooks each time the game is updated. It’s a very nice design.
One problem with Patcher, at the moment, is that it contains hardcoded strings for some DLL names that aren’t correct for the current Rust uMod releases, which are still called Oxide for now. So, if you download Patcher and the .opj file for Rust, then try to follow the documentation for uMod Patcher and try to run it, it will complain about not being able to find uMod.dll and a bunch of other stuff because you’re targeting an Oxide release rather than a uMod release. So here’s what you do:
- Download the source for uMod Patcher and open it in Visual Studio.
- Go to
src/hooks/InitMod.csand do a find/replace to swap"uMod.Interface"to"Oxide.Core.Interface", including quotes. - Go to
src/Patching/Patcher.csand change thePatch()method to look forOxide.Core.dllinstead ofuMod.dll - Build the project and copy the resulting
uModPatcher.exeinto your Rust server’sManageddirectory.
This allows you to target Oxide rather than uMod, and Patcher will now work. As a side note, you can’t get around this by downloading the prebuilt release for Oxide, because it’s an old version (2.x) and the current .opj file contains hook types that it doesn’t support.
The first thing that’ll happen when you successfully open a project file successfully is that it’ll probably complain about a bunch of things that have changed in the target binaries. This is normal and you can ignore the popups.
Here’s what the Patcher window looks like:
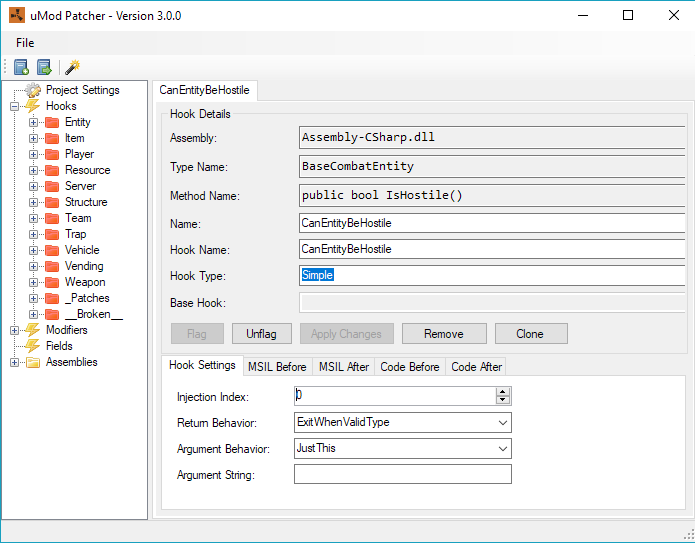
On the left you’ve got a tree of all the things defined in the JSON file:
- Hooks - Hooks that are to be injected into the target binaries’ IL. These are grouped into categories based on the “Hook Type” field. The folders go red when an item inside is flagged. I’ll explain flagging in a minute.
- Modifiers - These are patches that change the accessibility of type fields. This is useful if there’s a private or internal field in a class somewhere that you’d like to be able to mess with in a mod.
- Fields - These are fields that are to be injected into a type. I don’t think these are used for Rust right now, but they’re useful if you want to store some custom state in a class instance. These can tie in with a special type of hook that I’ll talk about later.
- Assemblies - This section of the tree lists all the assemblies that are in the Managed directory. By clicking through the assembly you can browse types and methods and create new hooks from within the UI.
Double clicking on any element opens up a tab with its properties.
Each type of patch in the project (hook, modifier, field) can be “flagged”, meaning that it won’t be applied when you hit the patch button (magic wand icon). A flagged patch has a little exclamation mark next to it, and any category that contains a flagged patch turns red in the UI. You can see in the screenshot above that all of the categories are red because they contain at least one flagged patch.
Each patch definition has a hash of its expected target data in the project file, and when you load the project file Patcher goes through and checks each set of target data to see if anything has changed. If the data has changed, the patch gets flagged. This allows you to quickly see which features might need fixing. You can also manually flag all or unflag all, or flag/unflag a single patch.
If you’re working with a server installation where Oxide is already installed, most things are going to end up flagged because the project file is meant to work on vanilla game files (i.e. take them and turn them into the Oxide versions). In my case I found it easiest to install the Rust server, install Oxide onto it, load the Patcher project, then hit “flag all”. That way I could unflag only my new hooks and patch them directly into the already modded binaries for less hassle. It’s worth noting that when you hit the patch button, it creates a backup binary automatically (filename_original.dll) and if you click patch again it’ll automatically patch from the backup, so you don’t need to keep moving/renaming files every time you make a new patch. ## Looking at existing hooks As this was the first time I worked with Patcher and I had no idea how it worked, I thought it best to take a look at how an existing hook worked first. Since I was working with traps, I figured the OnTurretTarget hook would be a good place to start. Here’s the hook details:
- Assembly: Assembly-CSharp.dll
- Type Name: AutoTurret
- Method Name: public void SetTarget(BaseCombatEntity)
- Name: OnTurretTarget
- Hook Name: OnTurretTarget
- Hook Type: Simple
- Base Hook: (none)
And the hook settings:
- Injection Index: 0
- Return Behaviour: ExitWhenValidType
- Argument Behaviour: All
- Argument String: (none)
The name is the name of the hook in the left panel, and the hook name is the name of the hook method that gets called in the user script. We’ll get into the hook settings later.
Taking a look at the code before and code after tabs shows exactly what this hook does. Here’s the code before:
public void SetTarget(global::BaseCombatEntity targ)
{
    if (targ != this.target)
    {
        global::Effect.server.Run((targ == null) ? this.targetLostEffect.resourcePath : this.targetAcquiredEffect.resourcePath, base.transform.position, Vector3.up, null, false);
    }
    this.target = targ;
}
Here’s the code after:
public void SetTarget(global::BaseCombatEntity targ)
{
    if (Oxide.Core.Interface.CallHook("OnTurretTarget", this, targ) != null)
    {
        return;
    }
    if (targ != this.target)
    {
        global::Effect.server.Run((targ == null) ? this.targetLostEffect.resourcePath : this.targetAcquiredEffect.resourcePath, base.transform.position, Vector3.up, null, false);
    }
    this.target = targ;
}
We can see that code was injected that calls into Oxide.Core.Interface (which, if you remember, was something we changed from uMod.Interface earlier) in order to trigger the OnTurretTarget hook. Looking at the API documentation, we can see that the example usage of this hook is as follows:
object OnTurretTarget(AutoTurret turret, BaseCombatEntity entity)
{
    Puts("OnTurretTarget works!");
    return null;
}
The documentation says “Called when an autoturret attempts to target an entity. Returning a non-null value overrides default behavior.” We can see that in the injected code - if the hook returns anything but null, the method returns without actually setting the target. This is what the ExitWhenValidType return behaviour does.
The eagle-eyed of you will have noticed that the hook method has two parameters - an AutoTurret and a BaseCombatEntity - whereas the SetTarget method only has one. Technically this isn’t true though; SetTarget is an instance method, which has this implicitly passed as its first parameter. As such, because argument behaviour is set to “All” in the hook settings, the this parameter is passed to the hook.
This all seems easy enough. Except when I looked at the code for flamethrower turrets and shotgun traps, they turned out to be built very differently to the autoturret.
For those of you who are unfamiliar with the game, the autoturret looks for targets depending on its mode (in “attack all” mode it looks for anyone not authorised on it, in peacekeeper mode it looks for anyone who has been flagged as hostile by brandishing weapons or damaging people/things), lock onto that target, and fire at it until it kills the target, loses sight of the target, or runs out of ammo. This logic is split into a number of functions for finding targets, setting the current target, keeping track of the current target, shooting at the target, and checking things like how much ammo is left.
The other trap types are less discriminating and don’t really have any state. If a player without building privilege walks within range, they start firing. Instead of having a bunch of separate methods (including a SetTarget method like above) everything is pretty much in a single CheckTrigger method which is called on every server tick. This means we can’t simply add a hook to the start of the method like above - it doesn’t tell us that the trigger was actually, well, triggered. ## More advanced hook settings After exploring the different options in the Patcher UI, I noticed the UseArgumentString option in the Argument Behaviour and Return Behaviour settings. I ended up looking into the source code to help better understand what was going on with these. In the ParseArgumentString method of the Simple hook class, and in the methods that called it, I could see that they were looking for syntax in the following format:
(this|((p|a|l|v)\d+))(, (this|((p|a|l|v)\d+)))*( => (ret(urn)?|((a|l)\d+)))?I apologise to those of you who don’t read regex! Here’s a wordier way of putting it:
- Arguments passed to the hook are first, and are comma separated.
pandasignify method arguments (parameters). They both mean the same thing. For example,a0andv0both mean the first argument in the hooked method.landvsignify locals (variables). They both mean the same thing. For example,l0andv0both mean the first entry in the hooked method’s locals table. You can figure out which local index matches which variable by looking at theldlocandstlocIL instructions in the code, or by looking at the variables list in Telerik JustDecompile or dotPeek with the Reflexil plugin.thismeans thethisreference. It’s not valid to use this outside of an instance method.
- When you set the return behaviour to
UseArgumentString, you should specify a=>after the argument list, followed by a specifier of where the return value of the hook should end up.asignifies an argument value that should be assigned from the return value of the hook, e.g.a0for the first argument. For some reasonpisn’t valid here.lsignifies a local variable that should be assigned from the return value of the hook, e.g.l0for the first local. For some reasonvisn’t valid here.
So, for example, if I want to make a hook that is passed the second method argument and local variable index 6, with the hook’s return value placed into local variable 3, my argument string should be as follows:
a1, l6 => l3This is pretty powerful! ## Creating the new hooks Pseudo-code of the logic in FlameTurret.CheckTrigger() is as follows:
public bool CheckTrigger()
{
    // get all players that are potentially near the turret
    var nearbyPlayers = this.triggerArea.GetPlayers();
    bool flag = false;
    foreach (var player in nearbyPlayers)
    {
        // is this player an invalid target (asleep, dead, authorised, too far away)
        if (player.IsSleeping() || !player.IsAlive() || player.IsBuildingAuthed() ||
            player.DistanceTo(this) > this.targetRange)
        {
            continue;
        }
        // cast a ray from the player to the trap and record the entities hit
        var hits = GamePhysics.TraceRay(player, this);
        foreach (var hitEntity in hits)
        {
            // did we hit something other than the trap?
            if (hitEntity != this)
            {
                // did we hit something that should block projectiles?
                if (entity.ShouldBlockProjectiles())
                {
                    // player is behind something
                    break;
                }
            }
            else
            {
                // player is valid target
                flag = true;
                break;
            }
        }
        if (flag)
        {
            // we found a valid target
            break;
        }
    }
    // true = fire the trap, false = don't fire the trap
    return flag;
}
The simplest approach here is to just inject the check at the very end of the method, right before the return, and have flag passed to the hook. It involves no real reverse engineering because we know the last two instructions of the method will be an ldloc to load the flag local onto the evaluation stack, and a ret to pop the value off the evaluation stack and return it. Effectively we just set up our hook’s offset to be just before the second to last IL instruction (the ldloc), set up our argument string so that the flag local, player local, and this are passed and then flag is assigned by the hook’s return value, and that’s that.
If you’re looking at the code above, you might be wondering how we can pass the player variable to a hook just before the return, because at that point the player variable is out of scope. The funny thing about the .NET CLR is that it doesn’t know what local variable scoping is - it’s a concept solely controlled and enforced by the compiler. As such, with IL, you can access all local variables in in a method at any time you like. The decompiled results end up a bit weird but it works anyway.
There are three problems with that approach, though. The first is that it means the hook is called every time CheckTrigger is called, regardless of whether or not a player was actually targeted. That’s pretty bad for performance, and isn’t very user-friendly for plugin developers. The second problem is that a hook overriding the behaviour and telling the game not to fire at the player causes the method to exit without considering other potential players that might be nearby. Another problem is that control flow in code doesn’t necessarily translate perfectly between C# source and IL. It turns out that injecting code just before the return, combined with local usage outside of scope, causes some weird results when you decompile the source of this particular method (duplication of the injected code at different sites), and I’d personally prefer to avoid that.
Instead, it’s better to inject the hook after flag is set to true, but before the break, so we only call the hook when we’ve found a valid target. If the hook then returns false to override the game logic, the code still considers other players.
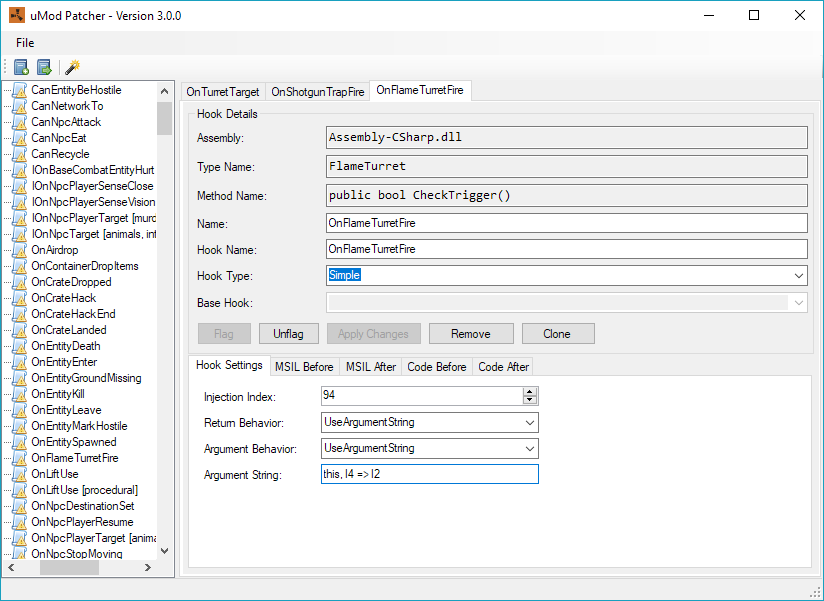
This code was fairly easy to find in the IL, because I knew I was looking for an ldc.i4.1 instruction (load constant 32-bit integer value 1 onto the evaluation stack), followed by an stloc instruction (store value on the top of the evaluation stack into a local variable), finally followed by a br instruction (branch) pointing toward the end of the method. In the FlameTurret.CheckTrigger method this starts at instruction offset 93:
93> IL_0125: ldc.i4.1
94> IL_0126: stloc.2
95> IL_0127: br.s IL_014c
By configuring our injection to occur at offset 94, we get the following:
93> IL_0125: ldc.i4.1       //        1 (true)
94> IL_0126: stloc.2        // flag = ^
/* hook code injected here! */
95> IL_0127: br.s IL_014c   // break
We can see that the flag variable is local index 2, and digging through the rest of the IL told me that the player variable is at index 4.
Putting this all together, we get the following settings:
The resulting patched code, after decompilation, looks a little like this:
public bool CheckTrigger()
{
    // get all players that are potentially near the turret
    var nearbyPlayers = this.triggerArea.GetAllPlayers();
    bool flag = false;
    foreach (var player in nearbyPlayers)
    {
        // is this player an invalid target (asleep, dead, authorised, too far)
        if (player.IsSleeping() || !player.IsAlive() || player.IsBuildingAuthed() ||
            player.DistanceTo(this) > this.targetRange)
        {
            continue;
        }
        // cast a ray from the player to the trap and record the entities hit
        var hits = GamePhysics.TraceRay(player, this);
        foreach (var hitEntity in hits)
        {
            // did we hit something other than the trap?
            if (hitEntity != this)
            {
                // did we hit something that should block projectiles?
                if (entity.ShouldBlockProjectiles())
                {
                    // player is behind something
                    break;
                }
            }
            else
            {
                // player is valid target
                flag = true;
                // call our hook
                object obj = Interface.CallHook("OnFlameTurretFire", this, player);
                // if the hook returned anything but null, assign it to flag
                if (obj as bool)
                {
                    flag = (bool)obj;
                }
                break;
            }
        }
        if (flag)
        {
            // we found a valid target
            break;
        }
    }
    // true = fire the trap, false = don't fire the trap
    return flag;
}
Looking good!
Duplicating this hook for the shotgun trap class was trivial because the code was almost identical. The only thing that changed was the injection index. ## Getting the hook in game This part is easy. Right click “Hooks” in the tree, click Flag All. This disables all hooks. Now go and find the new hooks you added, double click them, and click the Unflag button in their tab. You don’t need to do anything with the modifiers list unless you’ve added new ones - unflagging a modifier that has already been applied doesn’t do anything because it’s just changing access modifiers. Next, hit Patch in the toolbar (magic wand icon) and watch the logs fly by! If there are any errors it’ll let you know. Copy the log and paste it in a text editor to find the log line for your particular hook, to make sure it was applied. Now launch the game server and you can test out your new hook.
Here’s an example usage of the OnFlameTurretFire hook:
bool OnFlameTurretFire(FlameTurret turret, BasePlayer player)
{
    Puts($"Player {player.displayName} is getting rekt by a flame turret!");
    return true;
}
If you put this into your plugin code, set up a flame turret in game, deauth from the building cupboard, and walk in front of the turret, you’ll get flamed in the face and the server console will output a message saying you’re getting rekt. ## Further hackery Another cool thing I found in Patcher, but didn’t end up needing to use, is the Modify hook type. This allows you to inject a sequence of IL instructions into a method at a custom offset, optionally removing some number of instructions at that offset beforehand. There are a bunch of these under the Patches category if you want some examples. ## Conclusion The uMod Patcher is a pretty interesting tool, and the code is fairly easy to read through if you’re interested in how other parts of it work. There’s no real documentation but it didn’t take me long to work most of this out (I pulled an all nighter and got it done). You could certainly adapt it to work with other applications, too.
I submitted a pull request with the new hooks. Hopefully it’ll be accepted soon and upstreamed, but in the meantime you can always take a look at the new hook data yourself, or just add it to your .opj file and have a play around with the new hooks.